buildflags - Ren'Py Config Management
A downloadable asset pack
buildflags.rpy is a system for configuration management for your Ren'Py project. It allows you to group together Ren'Py configuration values and arbitrary named flags and variables, then switch between those groups with just a single line of code.
Why do I need this?
Configuration management is an important tool for any software project that's built to be released in more than one context. Depending on the storefront you're using to host your game, what type of game edition you're shipping (demo, full release, special edition, special builds for testers or streamers, etc), or even what platform you're building for, you may want to set your Ren'Py configuration values differently.
But this isn't the only thing buildflags.rpy can do. In addition to managing values in the Ren'Py `config` domain, buildflags.rpy allows you to create arbitrary boolean flags or configuration values to use however you like. This is great for things like allowing you to develop demo and complete versions of your game simultaneously, using a boolean flag to disable full-game features for your demo build.
How does it work?
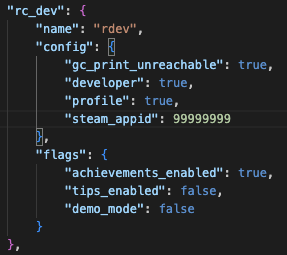
buildflags.rpy uses a file called `buildconfig.json` to define your build configurations. This is a file you create yourself and isn't supplied with the buildflags library. It's written using JavaScript Object Notation (JSON), a common text interchange format that's widely used for describing structured data. Let's take a look at the basic layout of buildconfig.json using an example:
{
    "dev": {
        "name": "dev",
        "config": {
            "gc_print_unreachable": true,
            "developer": true,
            "profile": true,
            "steam_appid": 99999999
        },
        "flags": {
            "achievements_enabled": true,
            "tips_enabled": false,
            "demo_mode": false
        }
    },
    "demo": {
        "name": "demo",
        "version": "1.1.0",
        "config": {
            "developer": false,
            "steam_appid": 88888888
        },
        "flags": {
            "achievements_enabled": false,
            "tips_enabled": false,
            "demo_mode": true
        }
    },
    "release": {
        "name": "v",
        "version": "1.0.0",
        "config": {
            "developer": false,
            "steam_appid": 99999999
        },
        "flags": {
            "achievements_enabled": true,
            "tips_enabled": false,
            "demo_mode": false
        }
    },
    "itch_release": {
        "name": "itch_v",
        "version": "1.0.0",
        "config": {
            "developer": false
        },
        "flags": {
            "achievements_enabled": true,
            "tips_enabled": true,
            "demo_mode": false
        }
    }
}
The top level keys in this JSON document are the names of the configuration sets. Each one defines a name and version number, as well as a dictionary of configuration values and a dictionary of extra flags.
The name and version fields are used for defining the name of the built artifacts. Artifacts are built with the name format `{projectname}_{buildflags.name}_{buildflags.version}`. So in the above config, if your project name was MyProject and you selected the demo config, your artifacts would be named MyProject_demo_1.1.0.
The config dictionary allows you to set values in Ren'Py's config namespace. In the above buildconfig.json file, we use this dictionary to enable the helpful `developer`, `profile`, and `gc_print_unreachable` flags for our development builds. These options can help a lot when developing, but cause unwanted behaviour in release builds, so they're disabled for releases. We can also set different Steam app IDs for our demo and full game builds, which is necessary given the way Steam demos work in Steamworks.
Lastly, we have the flags section, for defining arbitrary flags. We've created 3 flags in this example: `achievements_enabled`, `tips_enabled`, and `demo_mode`. Note that buildflags.rpy doesn't define what these flags do, you'll have to implement their functionality yourself in your game. Likewise, these are just three example flags, you can define any flags you'd like, and they don't strictly need to be boolean values. But for the sake of this example, we use `demo_mode` to control whether the game cuts off at the demo point or not, making it easy for us to develop both the demo and full versions at the same time. And we use `tips_enabled` to add a Ko-Fi tip link to our main menu, which is fine for itch releases but which is against the Steam store rules. Note that you do need to set a value for every flag you'll reference in every one of your configs. They do not have default values.
Setting your build version
Once you've defined your buildconfig.json, it's time to set your build version. To do this, open up `0buildflags.rpy`. The last line of the file is a call to `load_buildconfig`. Replace the argument of `load_buildconfig` with the name of the configuration you want to select. That's all you need to do to switch configs!
An important note: normally the `build.name` property is defined in `options.rpy`. For buildflags.rpy to work correctly, this value should be set on the first line of `0buildflags.rpy`. The included copy of `0buildflags.rpy` sets a build name value here. You should change this value to the name of your project, and remove the `build.name` line from your `options.rpy` file.
Questions, support, and licensing
If you have questions or need help, please post in the community discussion board on this page.
Note that this software is provided free of charge, as-is, and without warranty or any guarantee of support. I can only provide help relating to this software on a best-effort basis.
buildflags.rpy is licensed under the MIT license. The full text of the license agreement is included at the beginning of the source code. You are not required to provide any additional forms of attribution to me beyond the inclusion of the license text and copyright notice in your project, but of course you are welcome to include attribution if you like.
Download
Click download now to get access to the following files: