Photoshop Blend Modes in Ren'Py

Ren'Py has plenty of tools for manipulating your images, but the ones that come out of the box only provide a glimpse into what's possible with the powerful engines on which Ren'Py is built. I ran headfirst into this when designing the lighting for the cafe background in Employee A. My workflow for drawing isometric backgrounds is a relatively simple three-step process:
1. Create an isometric map using Tiled, then export it as PNG image.
2. Convert the PNG to an Aseprite project, then draw in all the details that weren't included in the original Tiled map, as well as clean up any leftover jank from that process.
3. Draw a global lighting layer over the entire map to give it an appropriate sense of depth and mood.
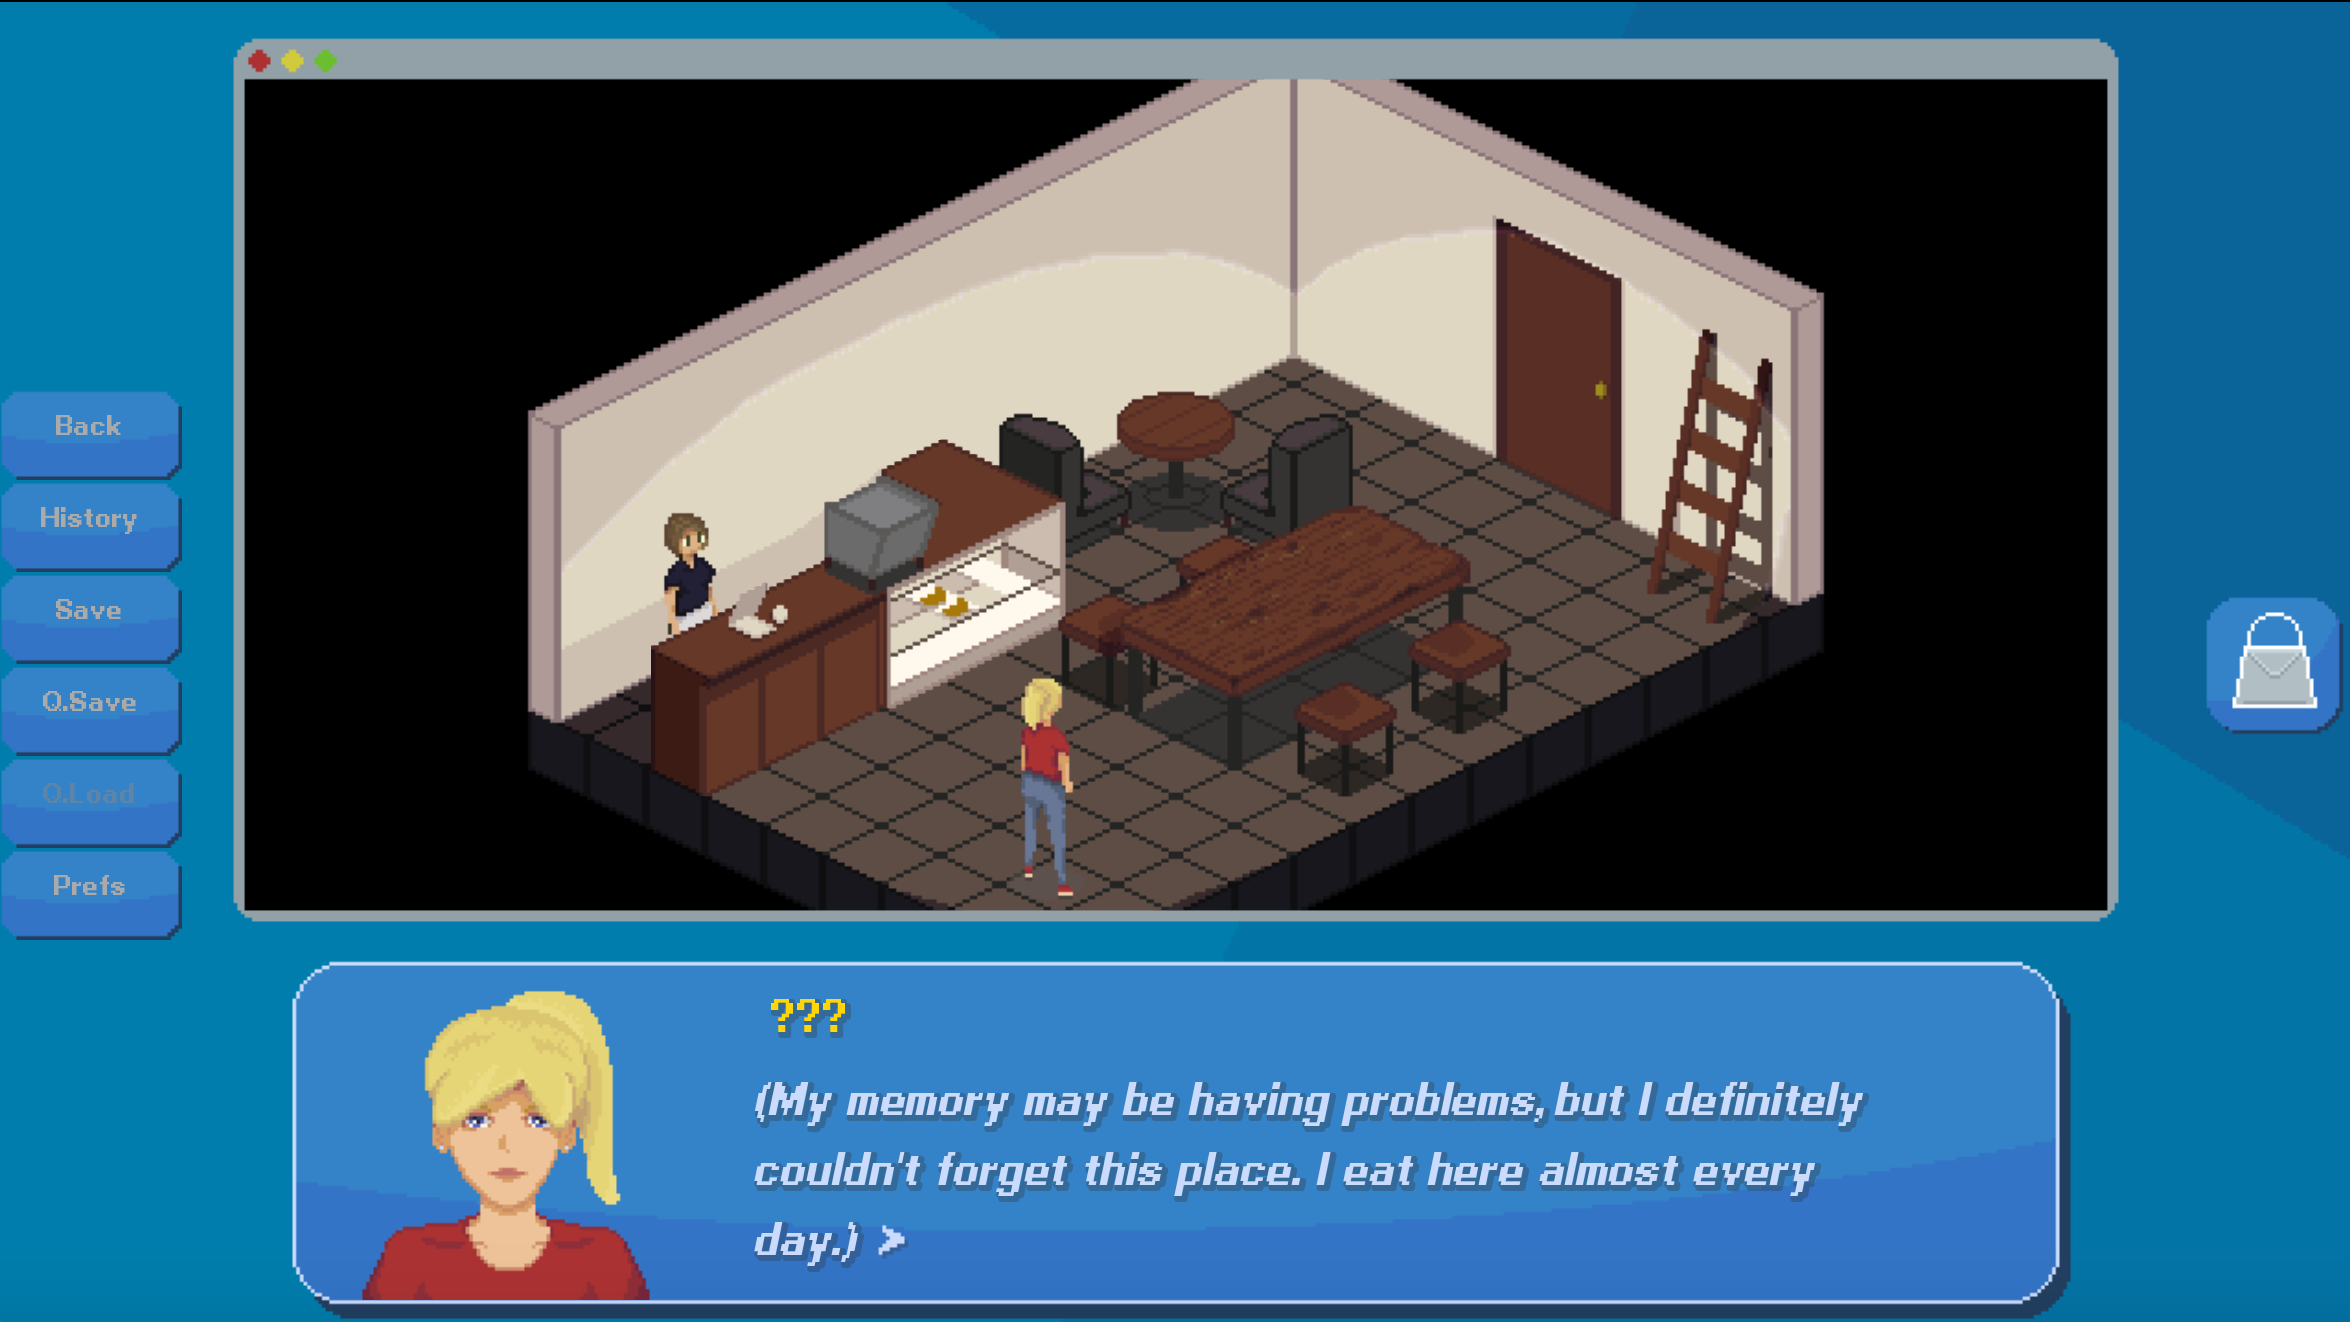
That last step is what we're going to be talking about today. Take a look at this screenshot from a recent build of Employee A.
The room, and all the objects within, have a nice warm colour temperature. That's because of step 3 from above: the entire room is painted over with a lighting layer consisting of a semi-transparent darkish yellow colour (#827740ae in RGBA hex format) as well as a semi-transparent dark brown layer (#2d282cae) for the large shadows on the walls. All this was applied over top of the main image using Aseprite's Soft Light blending algorithm.
Looking more closely at the image above, A and Charlotte look a little bit out of place in the room. That's because they don't have that global lighting applied to them - this makes their colours, especially the relatively bright primary colours on A's sprite, appear unreasonably vivid. Ideally we could just soft blend that same dark yellow over A and Charlotte and call it a day.
But unfortunately, not every room in Employee A is going to be lit in this colour. Does that mean we have to make separate sprites for each character based on what room they're in? That's hardly an ideal circumstance. Let's see if we can find a way to apply the lighting in Ren'Py.
Blend Modes
Photoshop, and other image editing software, allow users to select from a wide variety of algorithms for combining two images. These are called blend modes. The simplest one is just over: if you put image B on top of image A, all the colour values from image A are ignored and replaced entirely by image B. (This scenario ignores alpha compositing, which luckily isn't something we really have to deal with here). But there are all sorts to choose from. Some, like multiply or screen, combine the images in relatively simple ways. Others, like overlay, are more complex. Soft light, the one we're interested in, is actually one of the most complex of all. Each blend mode can be defined as a function that transforms two real numbers (the values of a single colour channel of a single pixel of the lower and upper images) into one real number (the value of that colour channel at that pixel in the output image). This is usually written as f(a, b), where a is the lower image and b is the upper. So for our simplest operator, where the bottom image is totally occluded, we just have f(a, b) = b. Multiply is also simple: f(a, b) = ab. But what about soft light?

Source: Wikipedia
Unfortunately, a bit more complicated, but nothing we couldn't implement in code, right?
Enter the Matrix
Ren'Py has a standard method for transforming the colour of images called Matrixcolor. This allows you to multiply a 4-item vector representing the image's original colour at a specific pixel by a 4x4 matrix of your choosing to produce output colours. This can produce a huge array of colour changes such as colour wheel rotations, tints, and recolours. This seems like the perfect vehicle for implementing our function.
At least it seemed that way to me at first. Matrixcolor inherently cannot represent any nonlinear transformation from one colour to another, and the soft light algorithm is very much nonlinear simply from the discontinuity at b=0.5 (not to mention the quadratic and square root terms). Additionally, Matrixcolor doesn't combine two images, it simply makes a static transformation to the source image.
There is an extension to the Matrixcolor architecture called ColorMatrix which can be used in animations, but it can only use two images as input when the images are occurring at different points in a transformation's timebase. For a static, non-animated colour correction, this won't work either.
GPU Time
This leads us into the deepest part of Ren'Py's image manipulation suite: GLSL shaders. GLSL is the GL Shader Language, a small C-like language for writing short OpenGL image manipulation routines that run on your graphics card. Ren'Py exposes some built-in GLSL variables that allow us to have access to both the source image of a transformation and an input image (in our case the dark yellow colour), plus a canvas in which to combine them. Hooray!
I have basically no experience with GLSL. The code to do the soft light blend in GLSL isn't especially complex, but nevertheless I found an MIT-licensed open-source repository by Jamie Owen containing existing GLSL implementations of several Photoshop blend modes, including soft light. All I needed to do was adapt this to Ren'Py format.
Creating a Transform
Doing some research online, I could see that there had been quite a few people over the years asking for blend modes in Ren'Py, but there wasn't a good solution. I figured this was as good a time as any to convert my adaptation of Jamie Owen's library into an MIT-licensed library of my own containing his transforms pre-converted to Ren'Py shaders. Here's an example of the soft light shader:
soft_light_blend_mode = BlendMode("crosscouloir.soft_light")
soft_light_blend_mode.vars = """
uniform float u_lod_bias;
uniform sampler2D tex0;
uniform vec4 u_light_color;
attribute vec2 a_tex_coord;
varying vec2 v_tex_coord;
"""
soft_light_blend_mode.fragment_functions = """
float blendSoftLight(float base, float blend) {
   return (blend<0.5)?(2.0*base*blend+base*base*(1.0-2.0*blend)):(sqrt(base)*(2.0*blend-1.0)+2.0*base*(1.0-blend));
}
vec3 blendSoftLight(vec3 base, vec3 blend) {
   return vec3(blendSoftLight(base.r,blend.r),blendSoftLight(base.g,blend.g),blendSoftLight(base.b,blend.b));
}
vec3 blendSoftLight(vec3 base, vec3 blend, float opacity) {
   return (blendSoftLight(base, blend) * opacity + base * (1.0 - opacity));
}
"""
soft_light_blend_mode.vertex_shader = """ v_tex_coord = a_tex_coord; """
soft_light_blend_mode.fragment_shader = """
vec4 bgcolor = texture2D(tex0, v_tex_coord.st, u_lod_bias);
vec3 blended = blendSoftLight(bgcolor.xyz, u_light_color.xyz, u_light_color.w);
gl_FragColor = vec4(blended, bgcolor.w);
"""
soft_light_blend_mode.register()
Basically all this code does is capture a pixel from the current texture (the base image), apply the ported soft light blend code along with an input colour at a specific opacity (representing the light intensity here), and set the pixel colour to the output. Unfortunately I don't have much more to say about it, since I'm a newbie to GLSL myself!
Don't worry about having to copy/paste this mess either - the entire package, along with installation instructions, is available for free on my GitHub. Currently only the soft light algorithm is present, but I'll be porting over the rest of them in time.
Now let's see the result!
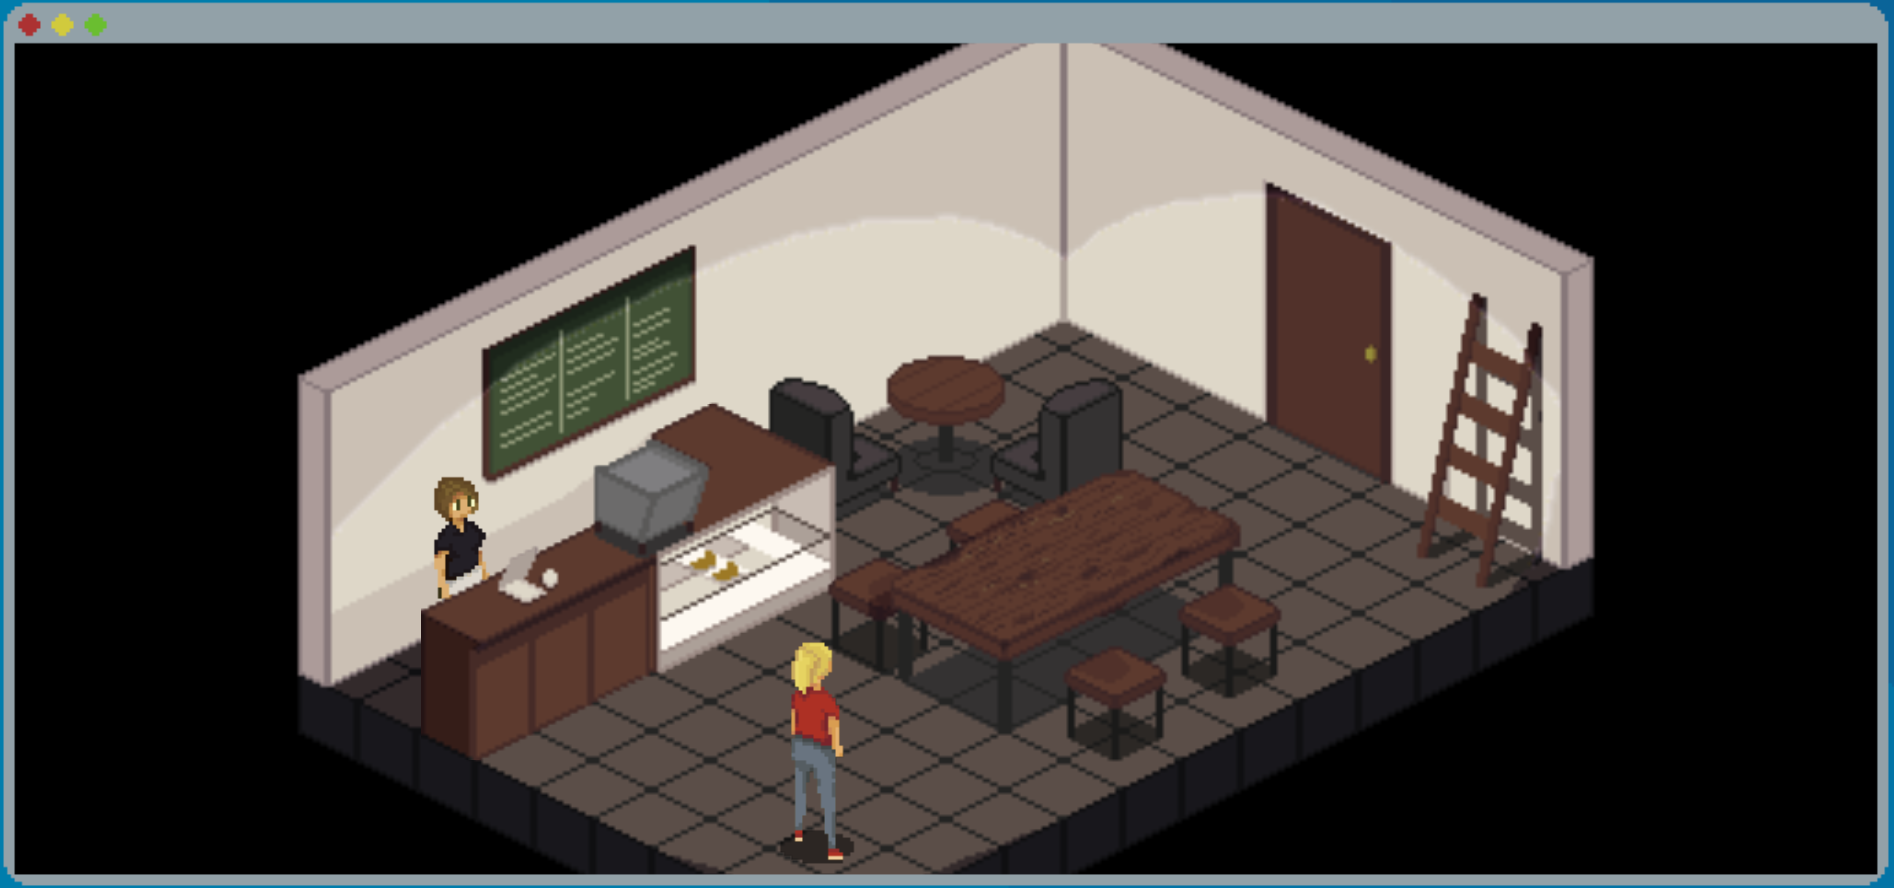
A's colour temperature has been significantly warmed up, and the saturation of her bright shirt looks way less out of place now. She fits much better in the room thanks to the lighting. And the best part is, when she moves to another room, her colours will always change to match!
A Note on Licensing
The code originally written by Jamie Owen was released under the MIT license, and the code I'm releasing is MIT licensed as well. This allows you to use it for any purpose you wish, including commercial, for-profit pursuits, as well as for redistribution with or without modifications. The only stipulation is that you include a copy of the MIT license notice somewhere in your project, so please make sure to do that. You don't need to credit me when using this library, but I'd always love to hear feedback and suggestions. Please see the License and Contributing sections of the project readme for more information.
I hope you find this tidbit helpful. Thanks for reading, and don't forget to follow me on Twitter @cross_couloir for more updates!
Comments
Log in with itch.io to leave a comment.
Hey, have you tried making any of the custom new blend modes in the newer versions of renpy?
Another great tutorial!